Cleaning Extractor Hoods and Filters
How To Clean Your Cooker’s Extractor Hood and Filter
Having a cooker hood installed in your kitchen means, in theory, that all the smells and grease from your cooking is sucked through the filter into the hood, trapping the grease and smell and helping to keep your kitchen smelling fresher and appearing cleaner too.
Cooker hoods and filters don’t require much in the way of maintenance, but if you make the effort to clean them regularly, you will prolong their life and save yourself money in the long run.
Cleaning Cooker Hood Covers Guide
Step by step guide to cleaning cooker hoods in your kitchen
- The first step to cleaning your cooker hood is finding out how to remove the cover on the underside of the hood.
- This is usually held on by spring release clips and they are easy to remove.
- Depending on the design, there may be one or more sections of the cover to remove.
- If you haven’t cleaned it for a while, the cover may be sticky with grease, or feel quite dirty to the touch.
- There are a few ways of cleaning the metal part of the hood.
- Ordinary hot water and washing up liquid will do the job, or wash the metal sections in the dishwasher, if they’ll fit.
- Another method is to soak them in the bath overnight using biological washing powder to break down the grease.
- Whatever method you use, take your time to get as much grease off the covers as possible.
- This is a job which should also be repeated regularly, around every 3 to 6 months.
Cleaning the Cooker Hood Filter
- Not all cooker hoods have a separate paper filter in addition to the cover.
- If you have a chimney style hood, the cover does the job of the filter too.
- As filters are made from a special type of paper, they cannot be easily cleaned and are best replaced.
- Most large DIY warehouses will sell cooker hood filter paper, and you just need to measure the old filter, cut another piece the same size and slot it into the gap.
- If you can’t easily find filter paper in your local store, it is easy to find online.
- If your cooker hood has a separate carbon filter designed to removed smells those can’t be cleaned either and you will have to source a replacement from the hood manufacturer.
Cleaning the outside of the cooker hood
- The outside of the cooker hood can get sticky and dirty too, so don’t forget to clean the whole unit when you are dealing with the filter and the cover.
- The best method of cleaning is probably using kitchen cleaning spray or soap and hot water with a soft cloth or sponge – anything abrasive such as wire wool will scratch the surface of your cooker hood.
- Any stubborn patches can be treated with some bicarbonate of soda mixed into a stiff paste, but remember to be gentle and don’t scrub at the surface.
- If your cooker hood is stainless steel, once you have got all the grease off the steel polish using some baby oil which will help to keep fingermarks at bay.
How To Clean Your Oven Hob
 However careful you are when cooking, it’s inevitable that food gets spilled, pots boil over and your kitchen hob starts to look grubby and dirty.
Cleaning the hob isn’t a big job, and if you do it regularly and don’t allow the grease and grime to build up, it’s a job which will only take a few minutes.
There are a many different types of hob though, and the best cleaning method will depend on what your hob is made from.
Cleaning Ceramic and Glass Hobs
This is the type of hob which is perfectly smooth on the surface with no rings visible.
The fact that it is totally flat is a bonus when it comes to cleaning as there are no awkward corners for food to get lodged in.
The first step of hob cleaning is always to remove any large lumps of food or to scrape away any dried on bits of food.
Take care when scraping using a sharp object as you could easily scratch the surface of your hob.
Once you have removed the larger marks, use a cleaning spray or cream to clean the rest of the hob.
The exact brand of cleaner doesn’t matter, but you should look for something which is designed to tackle grease, and which is non-abrasive.
Any cleaning product with granules in it could damage the surface of your hob.
Clean the hob using a circular motion with a soft cloth or sponge, and make sure you remove all of the cleaning product with water before using kitchen paper to dry the hob.
Electric Hobs With Hot Plates or Cookers with Rings
Things become a little more difficult if you have a gas or electric cooker with rings of varying sizes, or an electric cooker with large hot plates.
Check to see first whether the hot plates and rings can be removed for washing separately.
If they can, this will make your job easier.
Gas rings or hot plates which can be removed can be washed with hot soapy water and washing up liquid, or use a commercial kitchen cleaning spray or clean on them.
Make sure you rinse them well and dry any rings and plates well before replacing.
If you have an electric cooker, it’s always best to switch off the power when cooking.
Use your kitchen spray or cream on the hob once the rings have been removed.
Cleaning products work better when you leave them a few minutes to soak in rather than try to start cleaning immediately.
Use a soft cloth or sponge rather than wire wool.
Cleaning Induction Hobs
One of the main appeals of induction hobs is that food is less likely get burned on in the first place, making the hob easier to clean.
Again the same rules apply; use a kitchen spray or cream which will cut through the grease, and rinse using plain water to make sure you remove all the cleaning product.
A small amount of white vinegar will make the hob shine.
Cleaning a Microwave Oven
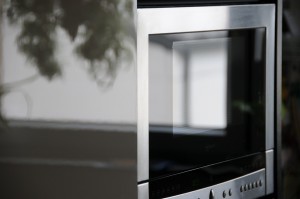 Most British homes now have a microwave, and they’ve transformed the way we cook our family meals.
Microwaves can be harder to clean than conventional ovens though as food can quickly become hardened and difficult to remove.
There are however some very simple tips to make life easier when cleaning your microwave.
Cleaning the Turntable
Most microwaves have removable turntables made of glass, and these are the easiest part of the microwave to clean.
The simplest way is to wash the turntable in the dishwasher on a hot cycle, or in the sink with lots of hot water and washing up liquid.
Try to avoid using cleaning products which are abrasive or which have granules in them as these can scratch the surface of your microwave turntable.
Loosening Baked on Food
One of the main difficulties with cleaning a microwave is getting rid of baked on food or splatters from cooking.
The best way of softening food is by creating steam inside the oven. Once you’ve replaced the clean turntable – or at the very start of the process – put a bowl filled with water, a chopped up lemon or lime and three or four tablespoons of white vinegar in the microwave and run it on a “high” setting for three or four minutes.
This isn’t an exact science; the length of time you will need to run the microwave will depend on how powerful the motor is and how much water you have.
You are trying to create a steamy atmosphere inside the microwave as the water boils, with the vinegar and lemon helping to soften food stains.
Remove the bowl with the water, and wipe away as many of the stains and marks as you can with kitchen paper.
If you don’t have any citrus fruits and vinegar in the house, a similar effect can be achieved by putting a teaspoon of washing up liquid into your waster before creating the steam.
Can I use Cleaning Products on my Microwave?
Often, the process of creating steam inside the microwave and wiping it over with paper is enough to get it clean.
If it still feels greasy and dirty, then you can use kitchen spray products or cleaning creams to clean the interior of the microwave.
The key to doing this is making sure that you take care to remove every last trace of spray or cream by rinsing it carefully with water before you attempt to use your microwave again as nobody wants their meals to taste of kitchen cleaner. Keep the quantity of products you use to a minimum.
Cleaning the Outside of the Microwave
After you’ve tackled the inside, it’s time to make sure that the outside is clean too.
Again you can use kitchen sprays and cleaners on the surface, but it is very important to make sure that no cleaner or water makes its way into the internal workings of the microwave through air vents and this can be very dangerous.
Always unplug the microwave before using cleaning products on the outside.