🧱 How to Tile a Kitchen Floor: Step-by-Step Guide
Tiling your kitchen floor can transform the look of the entire room. With the right preparation and tools, it’s a manageable DIY task even for beginners. Follow these detailed steps to get a professional-looking finish.
🔨 What You’ll Need
Tools:
-
Tape measure
-
Pencil or chalk line
-
Spirit level
-
Notched trowel
-
Tile cutter or wet saw
-
Rubber mallet
-
Tile spacers
-
Grout float
-
Mixing paddle (for drill)
-
Sponge and bucket
-
Knee pads
Materials:
-
Floor tiles
-
Flexible tile adhesive
-
Flexible grout
-
Primer (for porous surfaces)
-
Tile spacers
-
Sealer (for natural stone tiles, if applicable)
🧱 Step-by-Step Instructions
Step 1: Prepare the Subfloor
-
Clean and level the subfloor. Remove any debris, dust, or old adhesive.
-
Check for flatness using a spirit level. If uneven, use a self-levelling compound and allow it to dry fully.
-
Prime the surface if it’s porous (e.g., plywood or concrete).
Step 2: Plan the Tile Layout
-
Find the centre point of the room using a chalk line or tape measure.
-
Dry-lay tiles from the centre outward to ensure a balanced layout.
-
Avoid thin slivers of tile at edges; adjust starting point if needed.
Step 3: Mix and Apply Adhesive
-
Mix adhesive as per the manufacturer's instructions.
-
Starting in one corner (preferably at the furthest point from the door), use a notched trowel to spread adhesive evenly.
-
Only cover about 1 square metre at a time to prevent drying out.
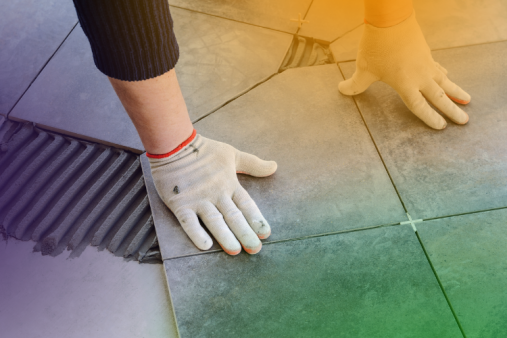
Step 4: Lay the Tiles
-
Place the first tile, pressing firmly and slightly twisting to bed it into the adhesive.
-
Insert tile spacers between tiles for uniform grout lines.
-
Continue laying tiles row by row, checking regularly with a spirit level and using a rubber mallet to tap tiles level.
Step 5: Cut Tiles to Fit
-
Use a manual tile cutter for straight cuts or a wet saw for intricate shapes (e.g., around corners or pipes).
-
Always wear safety gear when cutting tiles.
Step 6: Let Tiles Set
-
Allow adhesive to cure for 24 hours before walking on tiles or applying grout.
-
Remove tile spacers once adhesive is set.
Step 7: Apply Grout
-
Mix grout to a toothpaste-like consistency.
-
Use a rubber float to work it into the joints diagonally.
-
Wipe off excess with a damp sponge, rinsing regularly.
-
Let grout cure as directed, then buff off any haze with a dry cloth.
Step 8: Seal (if necessary)
-
If using porous tiles like stone or terracotta, apply a tile sealer once the grout is dry.
Step 9: Final Checks
-
Check for loose tiles, missed grout joints, or lippage (uneven edges).
-
Clean the floor thoroughly and enjoy your newly tiled kitchen!
❓ 10 Frequently Asked Questions About Tiling a Kitchen Floor
1. Can I tile over old kitchen floor tiles?
Yes, but only if the old tiles are solid, flat, and not damaged. Clean and degrease them thoroughly. A tile-on-tile primer may be needed.
2. What type of tiles are best for kitchen floors?
Porcelain tiles are a top choice due to their durability and water resistance. Avoid wall-only tiles—they’re too thin for floor use.
3. Do I need to use a special adhesive?
Yes. Use flexible tile adhesive designed for floors, especially if tiling onto timber or underfloor heating.
4. How thick should floor tile adhesive be?
Typically between 3–6mm depending on the size of your tile. Use the appropriate notched trowel to achieve this.
5. Can I walk on the tiles the same day?
No. Wait at least 24 hours for the adhesive to fully set before walking on the tiles.
6. How wide should grout lines be for floor tiles?
Usually 3mm to 5mm. Use spacers to keep the spacing consistent.
7. How do I tile around kitchen units or pipes?
Use a tile hole saw or wet cutter for pipe notches. For units, measure carefully and cut tiles to fit tightly around fixed objects.
8. Should I start tiling from the wall or the centre of the room?
It’s best to start from the centre and work outwards for a symmetrical layout. This helps avoid tiny cuts at edges.
9. What’s the best way to cut large format tiles?
Use a wet tile saw with a diamond blade for clean, straight cuts.
10. Do I need to seal the grout?
Grout is naturally porous. For kitchens, especially near sinks, sealing grout helps resist stains and moisture.
✅ Printable Checklist: How to Tile a Kitchen Floor
🔧 Tools
-
Tape measure
-
Pencil / chalk line
-
Notched trowel
-
Spirit level
-
Tile cutter or wet saw
-
Rubber mallet
-
Tile spacers
-
Grout float
-
Mixing paddle
-
Sponge & bucket
-
Knee pads
-
Safety goggles & gloves
🧱 Materials
-
Floor tiles
-
Flexible tile adhesive
-
Flexible grout
-
Primer (for subfloor)
-
Sealer (if using stone or porous tiles)
📋 Prep Work
-
Remove old floor covering and clean subfloor
-
Level floor using self-levelling compound if needed
-
Apply primer (if required)
-
Plan tile layout from room centre
🧰 Tiling Process
-
Mix and spread adhesive
-
Lay tiles with spacers, checking level
-
Cut tiles to fit at edges or around obstacles
-
Allow adhesive to cure (24 hours)
-
Remove tile spacers
🧼 Grouting & Finishing
-
Mix and apply grout
-
Clean tiles with sponge
-
Allow grout to dry
-
Seal tiles and grout (if needed)
-
Final clean-up and inspection