How to fit a kitchen worktop
If you’re standing back, scratching your head and wondering how to fit your kitchen worktops, don’t despair! Here’s a handy guide to fitting kitchen work surfaces.
Follow our simple instruction and you’ll have your new kitchen fitted in no time at all.
Failing that, find a local kitchen fitter and they’ll handle all the hard work for you!
What are the right tools for fitting kitchen worktops?
The first thing you must do, is to ensure you have suitable DIY tools to fit your kitchen worktops.
You should ensure you have safety goggles and a mask so that you don’t irritate your lungs with fine dust.
Here are some of the other tools you’ll need:
Tools needed when fitting kitchen worktops
- Soft pencil
- Masking tape
- A long carpenter’s ruler
- A circular saw or jigsaw
- Silicone sealant
- Metal brackets
Step by step guide to fitting worktops in your kitchen
So, you’re ready to start work.
Your kitchen base units are in place and all you need to do is join your worktops and fit the kitchen sink.
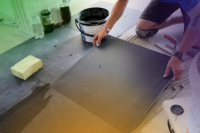
Place the kitchen work surfaces over the base units - you should have already cut these roughly down to size to make it easier to handle them.
Measure the space and mark the worktops with a soft pencil.
Remember to keep in mind the old saying ‘measure twice, cut once’!
Next, cut the worktops down to size.
Remember to turn the work surfaces upside down while you’re cutting - this way you can mask any slight mistakes!
A circular saw or jigsaw is best for this job.
An easy way to join the kitchen worktops together is to screw two metal strips to either piece and join them together using a metal bracket.
It goes without saying that unless you’re experienced at DIY, you’ll get better results by hiring a professional kitchen tradesman.
That way, you’re sure to have the kitchen that you’ve always dreamed of at the end.
If you’re happy to proceed with fitting your kitchen work surfaces, your next step is to fit the kitchen sink.
Start by turning the sink upside down on the worktops.
Draw a first line around the sink, then another line inside the outline that you drew.
Your manufacturer’s instructions should tell you how much space to leave between the two lines.
Now you’re ready to begin cutting.
Cut around the inner line carefully, using your jigsaw.
Slot the kitchen sink into the hole, remembering to line the hole with silicone sealant first.
When that’s done, all that is left is to fit the worktops into place.
Laminate edging will hide any unsightly edges that you’ve cut and give it a more polished look when it’s all finished.
Finally, you can now secure your kitchen worktops using right-angled brackets.
Finding a tradesman for kitchen worktop fitting
Remember, our kitchen worktop fitting instructions should be used as a guide.
If your DIY skills aren’t up to the task or you have any doubts at all, simply look up your local kitchen fitters and they’ll take the hassle out of the job for you.
If you are looking for local kitchen planners and designers for your dream kitchen you could find them using Top Tradespeople:
Here are some popular locations to find the right kitchen planners quotes.