A well-installed fence can last many years or decades, but for those who live in a property whose previous occupants did not make the effort to maintain or install proper fencing, their only option may be to start from scratch and put in a new fence to mark boundaries and keep the garden area secure. An attractive fence can add a whole new dimension to a garden, and there are many options for different panels and posts. Fences up to 6 feet in height can be erected without permission, although it is always polite to check with the neighbours first. Tall fences over this height may need planning permission, so check with the local Council before starting the job.
Five easy steps to panel fence building
Building a fence need not be as difficult as it seems once you have the basic steps required to get started.
We take you through step-by-step to a perfectly fenced perimeter.
Preparation
In many cases, a new fence will be erected in the same position as an existing fence. The first part of the preparation is therefore to remove all of the old fence panels and posts. Often, the posts can be simply and easily removed from the ground, but if they are cemented in then specialist equipment may be needed to remove them. Once the fence has gone, mark the boundary and the line of the new fence with some pegs and string.
Step 1 - Spacing The Fence Posts
Space your fence posts about 2 metres apart. How you space the posts depends to a certain extent on the terrain. Place the end or corner post first and use a line of rope or string to stretch between posts to maintain alignment. Drive a stake at every two metre interval at the exact spot you want to add each post. Measure the position of each post carefully – any mistakes would not only make the structure seem uneven, it can also compromise the overall strength of the fence once erect.
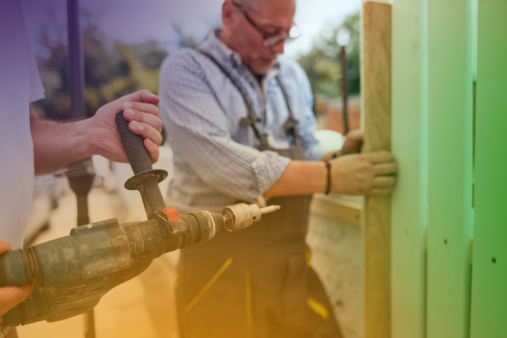
 Start at one end of the fence and work your way round. It is easiest to do this if the fence starts against a solid structure such as the wall of a house or garage. Dig a hole at least 2 feet deep for the post to sit in. Any shallower, and the risk is that the posts will quickly become loose over time. Place the post into the hole and pour concrete into the hole to support the post. Level the post using a spirit level to ensure it is completely vertical, and either hold it in place with supports or boards to keep it in place as the concrete dries. Complete the process for all of the posts you need to position.
Step 2 - Digging In The Posts
Each wooden post should be a good one third of the way into the ground.
Make sure corner and end posts are particularly rigid as these will bear the brunt of most of the weight and movement in high wind.
Adding gravel at the base of each hole will assist water drainage and help prevent moisture from building up and getting into the wood.
With that in mind, make sure all the wood you use is treated with a strong and long-lasting preservative.
Step 3 - Securing The Posts
Secure or pack the posts using soil or better still concrete.
Use a spirit-level to ensure all the posts are exactly 90 degrees upright before securing them in place.
Brace each post while concrete sets.
Sloping the concrete seal away from the post will help any water run off instead of standing and entering the wood.
Taper the tops of posts also to help rain water run off. Or you could use plastic capping for extra protection.
Step 4 - Bracing The Corners
Brace the corner posts carefully, these must bear the weight of the fence in two directions, remember.
Add a top and bottom rail using either a lap joint, where the rail is nailed to the surface or a grooved rail,
where it runs flush with the post surface.
You could also opt for a slotted joint, which looks good, but is a trickier technique.
If you do go for this option, make sure you treat all the grooved areas with wood preservative.
Step 5 - Attaching The Panels
Panel fences provide wind protection and privacy. Once all of the posts have been placed and are secured firmly into the ground, the next part of the job is to put up the panels. This is a far simpler process than putting in the posts as all that is required is some special panel clips which are used to attach the fence panels onto the posts. Space the panel clips evenly along the length of the posts and use the spirit level to ensure that the panels are level.
Attach the bottom of each panel to the post about 10 cm above the ground. Panels can be nailed to the post or fixed using panel clips. Just make sure the top of the panel is level.
If you're on a slope, step the panels at regular intervals to accommodate the changing contour of the ground.
Painting
 Many of the fence panels available from large DIY stores are sold ready painted, or treated with special preservative to stop them becoming weathered and damaged over time. Adding another few coats of preservative or staining the wood panels to suit personal taste is simple and easy to do, and no special painting techniques are required. A few coats of stain will be needed to get the best effect, and the paint may need to be reapplied after a few years.