Maximising the Miniscule: A UK Homeowner’s Guide to Designing the Perfect Tiny Bathroom
In many UK homes, the bathroom is often the smallest room in the house. Whether you’re dealing with a compact cloakroom, a restrictive en-suite, or a traditionally proportioned terraced house bathroom, the challenge is universal: how do you transform a tiny, functional space into a practical, beautiful, and relaxing sanctuary without knocking down walls?
The good news is that modern design is on your side. With strategic planning, innovative fixtures, and clever visual tricks, you can make the most of every square inch. This comprehensive guide is tailored for the UK homeowner considering their design options, proving that even the most miniature bathroom can be mighty.
1. The Planning Imperative: Rethinking the Footprint
Before you buy a single tile, you must treat your small space like a high-stakes jigsaw puzzle. Every decision needs to be measured, considered, and justified by its impact on floor space and perceived size.
The Layout is King
For a truly tiny bathroom, your primary goal is to free up floor space and ensure a comfortable flow.
- The Door Swing: This is often the biggest space thief. If possible, change a standard hinged door to a pocket door (which slides into the wall cavity) or a bi-fold door. If neither is possible, ensure the door swings out into the hall, not into the bathroom.
- Repositioning the Toilet: The soil stack location often restricts where the toilet can go, but repositioning it, even slightly, can unlock significant space for a larger shower or vanity. Consult a plumber early on; while this adds cost, it can fundamentally improve the room’s layout.
- The Work Triangle (Reimagined): In a small space, you can’t have a triangle, but you must maintain the correct distances. Ensure there is enough clear space (ideally 600mm) in front of the toilet, and that the shower door doesn't collide with the vanity.
Zoning and Accessibility
Even in a tiny room, think about separate zones for wet and dry activities. Use different wall treatments or floor tiles to subtly define the shower area from the rest of the room. This visual separation helps the room feel structured rather than cramped.
2. Fixtures and Fittings: Slimline and Wall-Hung Solutions
The secret to a successful small bathroom lies in sourcing fixtures specifically designed for tight spaces. UK suppliers offer excellent ranges of compact sanitaryware.
The Vanity and Basin
The standard vanity unit is likely too deep. Look for these space-saving alternatives:
- Reduced-Depth Vanities: These slimline units typically measure 350mm-400mm deep, compared to the standard 450mm-550mm. They offer storage without intruding on walking space.
- Wall-Hung Units: A wall-hung (floating) vanity is essential. By exposing the floor underneath, you trick the eye into perceiving more space, and it makes cleaning much easier.
- Corner Basins: For truly minuscule cloakrooms or en-suites, a corner basin or a slimline rectangular basin that sits only 200mm deep is a functional hero.
- Trough Basins: Long, narrow trough-style basins (sometimes shared in en-suites) are stylish and efficient, providing a wide washing area with minimal depth.
The Toilet
The toilet takes up a surprising amount of floor space.
- Wall-Hung Toilets: Like vanities, these expose the floor, maximizing perceived space. The cistern is hidden within the wall cavity (a concealed cistern), giving a streamlined, uncluttered look.
- Short-Projection Toilets: These models have a reduced forward projection (often less than 650mm), saving crucial inches compared to a standard toilet.
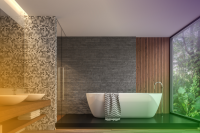
The Shower vs. The Bath
In a small primary bathroom, this is often the toughest choice.
- Ditch the Bath: If you rarely use it, sacrificing the bath for a large, comfortable shower is the best use of space. A generously sized shower elevates the sense of luxury.
- Quadrant Enclosures: A curved (quadrant) shower enclosure, particularly in a corner, is the most space-efficient shape.
- Sliding or Pivot Doors: Choose a door that doesn’t project outwards into the room when opened. A bi-fold or sliding door is ideal.
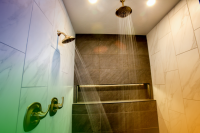
- Wet Room Conversion: For a genuine sense of space, converting to a wet room eliminates the bulky tray and enclosure entirely. The floor flows continuously, making the room feel open, though this is a complex and more expensive renovation demanding professional waterproofing and drainage.
3. Visual Magic: Colour, Light, and Mirrors
Once the physical layout is optimized, it's time to leverage optical illusions to make the room feel larger than it is.
Colour Palette: Monochromatic Minimalism
When dealing with small spaces, less is definitely more in terms of colour.
- Light and Bright: Whites, off-whites, pale greys, and light pastels reflect the most light, making the walls recede and the room feel airy.
- One Colour, Many Textures: To avoid a sterile look, keep the colour light but introduce depth through texture. Use matte paint on the walls, gloss tiles in the shower, and a textured stone or wood-effect vanity.
- Continuous Colour: Extend the wall colour/tile right up to the ceiling. Breaking the wall with a contrasting border or a picture rail cuts the height and makes the room feel squat.
The Power of Mirrors
Mirrors are the single most effective tool for expanding a tiny room.
- Wall-to-Wall Mirror: The ultimate trick. Fitting a large, unframed mirror across an entire wall (usually above the vanity) instantly doubles the perceived size of the room.
- Mirrored Cabinets: A must-have. These provide crucial hidden storage while maintaining the light-reflecting benefits of a large mirror. Look for recessed or partially recessed models that sit in the wall cavity to save even more space.
- Strategic Placement: Place the mirror opposite the doorway or opposite the light source (window or main light fitting) to bounce light deep into the room.
Lighting Strategy: Go Vertical
Poor lighting makes a small space feel like a cave. You need layered light.
- Recessed Lighting (Spotlights): Use multiple, evenly spaced spotlights to wash the room in light. Avoid a single central pendant, which creates harsh shadows.
- Task Lighting: Include integrated lighting in the mirrored cabinet or use wall sconces/LED strips either side of the mirror at face height. This is essential for grooming.
- Uplighting: Place LED strips under a floating vanity or a shelf to illuminate the floor. This visually "lifts" the fixtures and reinforces the sense of open floor space.
4. Tiling and Flooring: Creating Flow
The size and pattern of your tiles can dramatically alter the perception of space.
Large Format Tiles
This is a game-changer for small bathrooms.
- Fewer Grout Lines, More Space: Using large tiles (600mm x 600mm or larger) drastically reduces the number of grout lines. Grout lines break up the eye’s flow; fewer lines create a smooth, expansive, monolithic surface.
- Continuous Floor-to-Wall: Consider using the same tile on the floor and walls to further unify the surfaces, making it impossible to tell where the floor ends and the wall begins.
Rectangular Tiles and Direction
If using rectangular tiles (like metro tiles or planks), lay them strategically:
- To Widen the Room: Lay rectangular tiles horizontally (across the shortest wall).
- To Lengthen the Room: Lay rectangular tiles vertically or along the longest wall, drawing the eye to the end of the room.
The Illusion of Depth
Use darker tiles (like a slate grey or black) on the floor and lighter tiles on the walls. This grounding effect gives the room stability and depth, preventing it from feeling like it is floating.
5. Storage and Accessories: Maximising Vertical Space
When horizontal space is limited, the only way is up. Effective storage must be hidden, integrated, and vertical.
Niches and Recesses
Steal space from the wall cavity itself:
- Shower Niches: Instead of having a wire caddy or shelf jutting out into the shower space, build a recessed niche into the stud wall. This creates hidden storage for shampoos and soaps without sacrificing elbow room.
- Wall Recesses: If you have thick walls, consider creating a vertical recessed shelf or cupboard next to the toilet or vanity.
Vertical and Hidden Storage
Every piece of wall is a storage opportunity.
- Tall, Slim Cabinets: Instead of a wide linen closet, opt for a tall, very narrow cabinet (e.g., 300mm wide) that extends to the ceiling.
- Over-the-Door Storage: Use the often-forgotten space above the door for a high shelf to store spare towels or bulk items.
- Plinth Drawers: Some custom vanities can include a shallow drawer that pulls out from the toe kick (plinth), ideal for storing cleaning cloths or brushes.
Accessories and Finishing Touches
The right accessories reinforce the minimal aesthetic.
- Floating Shelves: A few strategically placed, narrow floating shelves offer decorative space without the bulk of traditional shelving.
- Integrated Hooks: Opt for stylish hooks on the back of the door or wall instead of a bulky towel ring or rail. If you need a rail, choose a wall-mounted heated towel rail that is tall and narrow.
- Ditch the Clutter: The cardinal rule of tiny bathrooms. Store toothbrushes, lotions, and soaps out of sight. A clean, empty counter surface instantly makes the room feel less cluttered and larger.
- Glass and Acrylic: Use transparent accessories, soap dispensers, or waste bins. Their transparency allows light to pass through and minimizes their visual presence.
6. The UK Renovation Journey: Quotes and Trade Considerations
For a small bathroom, the complexity of fitting multiple items into a tight space means labour costs can sometimes be disproportionately high.
Sourcing Quotes
When seeking quotes from UK fitters:
- Specify Compact Fixtures: Clearly list the exact slimline, wall-hung, and short-projection products you intend to use. Small space fittings can be trickier to install.
- Factor in Hidden Work: Be clear on whether the quote includes the complex work of chasing pipework into the walls for wall-hung items, waterproofing for wet rooms, or moving the soil pipe. These are major cost and time drivers.
- Get 3D Drawings: Ask your designer/supplier to provide a 3D rendering of the proposed layout. This is essential to ensure the space isn't too restrictive (e.g., checking you can comfortably sit on the toilet without your knees hitting the vanity).
Compliance (Part P and Part F)
Remember that even in a tiny room, safety and ventilation are non-negotiable under UK Building Regulations:
- Ventilation (Part F): An effective extractor fan is crucial in a small, often windowless room to prevent mildew and dampness.
- Electrics (Part P): Any electrical work (lighting, extractor, underfloor heating) must be done by a qualified electrician and legally certified.
By treating your small bathroom not as a limitation, but as a design puzzle, you can create a highly functional, sophisticated, and serene space that punches far above its weight. Prioritizing verticality, using light to your advantage, and choosing compact, streamlined fixtures will ensure your miniature bathroom is a masterpiece of efficiency and style